1.配置软件源
开始菜单 -> 软件和更新 -> 下载至: -> 其他站点, 选择一个国内的站点,个人习惯用阿里的
有独立显卡的到 软件和更新 -> 附加组件里可以安装专有显卡驱动
2. 更新
1 | sudo apt update && sudo apt upgrade -y |
3. 安装chrome
打开Firefox
访问:
https://www.google.cn/intl/zh-CN/chrome/
下载下来应该是个deb文件,直接双击deb文件就可以安装了
4. 安装chrome扩展:GooleHelper 方便访问谷歌
访问:
http://googlehelper.net/
下载下来是个zip包,双击打开解压
打开chrome扩展页面,点右上方的开发者模式,然后页面上方会出现3个按钮,点加载已解压的扩展程序,选择刚刚解压出来的ghelper_source文件夹就可以了,然后用自己的邮箱注册个账号就能使用了。
如果使用自建的话可以参考 这篇文章
5. 安装配置搜狗输入法
可参考这篇文章
首先,安装Fcitx输入框架
1 | sudo apt install fcitx |
下载搜狗拼音输入法
下载地址:
https://pinyin.sogou.com/linux/?r=pinyin
下载下来应该是个deb文件,直接双击deb文件安装 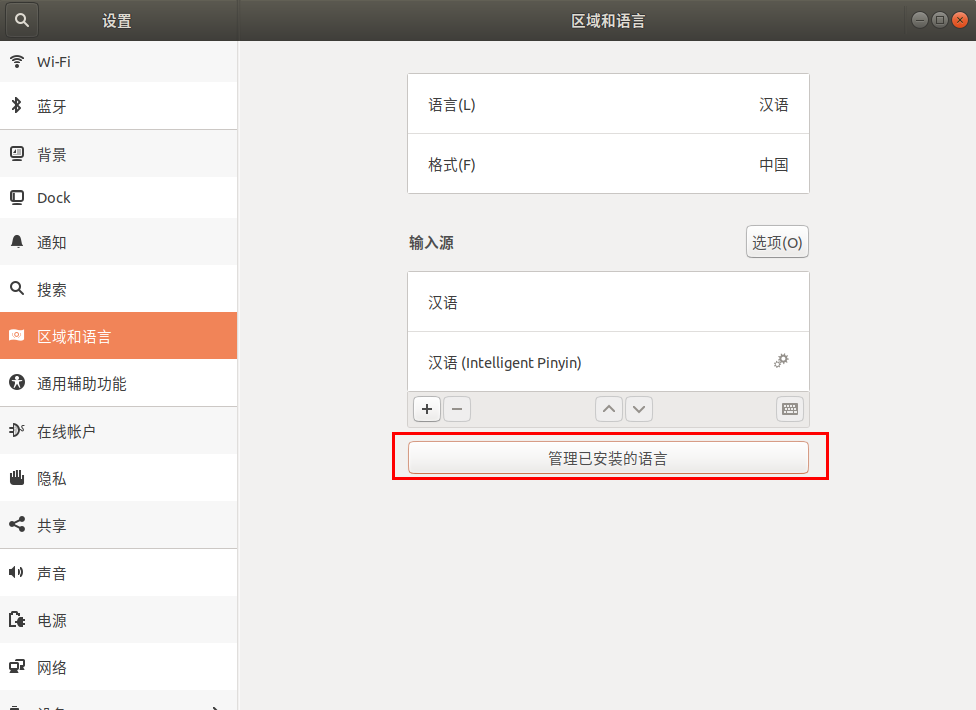
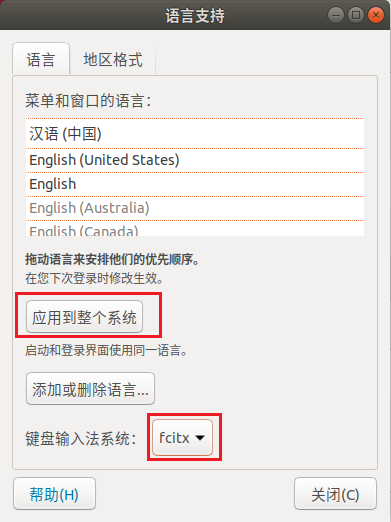
然后将当前用户进行注销后再进行登录(注销没有效果,重启就可以了)。
正常如果安装时就设置了使用中文的话,应该就不用再配置什么东西了
6. 配置sudo 免密码(看个人喜好,可以跳过)
1 | sudo visudo |
在最后一行加上:
1 | aaa ALL=(ALL) NOPASSWD: ALL |
其中 aaa 是你的用户名
7. 安装一些常用的的包
1 | sudo apt install git curl net-tools lftp hdparm tree vim emacs nano unar screen \ |
8. 安装QQ/TIM 等一些Windows上常用的软件
重点是这个项目:
https://github.com/wszqkzqk/deepin-wine-ubuntu
1 | git clone https://gitee.com/wszqkzqk/deepin-wine-for-ubuntu.git |
然后按照 README.md 上的介绍到 这里 下载相应的deb文件安装即可
WPS 2019 在 这个目录
9. 常用开发环境配置
Java
安装open-jdk
1
2
3
4
5
6
7
8# openjdk-11
sudo apt install openjdk-11-jdk
# jdk源码
sudo apt install openjdk-11-source
# openjdk-8
sudo apt install openjdk-8-jdk
# jdk源码
sudo apt install openjdk-8-source当然也可以用oracle-jdk,官网
以jdk11为例:
解压
1
sudo tar -zxvf jdk-11_linux-x64_bin.tar.gz -C /usr/
配置环境变量
1
2
3
4
5cat >> ~/.bashrc <<- "EOF"
export JAVA_HOME=/usr/jdk-11
export PATH=$JAVA_HOME/bin:$PATH
EOF
source ~/.bashrc下载Tomcat
1
2
3TOMCAT_VERSION=$(lftp https://mirrors.tuna.tsinghua.edu.cn/apache/tomcat/tomcat-9/ -e "cls;bye" | awk -F '/' '{print $1}' | awk -F 'v' '{print $2}' | xargs | awk -F ' ' '{print $1}')
wget https://mirrors.tuna.tsinghua.edu.cn/apache/tomcat/tomcat-9/v${TOMCAT_VERSION}/bin/apache-tomcat-${TOMCAT_VERSION}.tar.gz
tar -zxf apache-tomcat-${TOMCAT_VERSION}.tar.gz下载并配置maven
1
2
3
4
5
6
7
8
9
10
11
12
13
14
15
16
17
18
19
20
21
22
23
24
25
26
27
28
29
30
31
32
33cd /usr
MAVEN_VERSION=$(lftp https://mirrors.tuna.tsinghua.edu.cn/apache/maven/maven-3/ -e "cls;bye" | sort -rV | xargs | awk -F ' ' '{print $1}' | awk -F '/' '{print $1}')
sudo wget https://mirrors.tuna.tsinghua.edu.cn/apache/maven/maven-3/${MAVEN_VERSION}/binaries/apache-maven-${MAVEN_VERSION}-bin.tar.gz
sudo tar -zxvf apache-maven-${MAVEN_VERSION}-bin.tar.gz
cat >> ~/.bashrc <<- "EOF"
export M2_HOME=/usr/apache-maven-3.6
export PATH=$M2_HOME/bin:$PATH
EOF
sed -i "s:M2_HOME=.*:M2_HOME=/usr/apache-maven-${MAVEN_VERSION}:g" ~/.bashrc
source ~/.bashrc
mvn
mkdir -p ~/.m2
# 创建maven配置文件,并配置阿里云的maven源
cat > ~/.m2/settings.xml <<- "EOF"
<?xml version="1.0" encoding="UTF-8"?>
<settings
xmlns="http://maven.apache.org/SETTINGS/1.0.0"
xmlns:xsi="http://www.w3.org/2001/XMLSchema-instance"
xsi:schemaLocation="http://maven.apache.org/SETTINGS/1.0.0 http://maven.apache.org/xsd/settings-1.0.0.xsd">
<pluginGroups></pluginGroups>
<proxies></proxies>
<servers></servers>
<mirrors>
<mirror>
<id>alimaven</id>
<name>aliyun maven</name>
<url>http://maven.aliyun.com/nexus/content/groups/public/</url>
<mirrorOf>central</mirrorOf>
</mirror>
</mirrors>
<profiles></profiles>
</settings>
EOFPython
ubuntu 18.04 自带了python3.6 , 但 pip 得再装一下
1
sudo apt install python3-pip
配置
1
2
3
4
5
6
7
8
9
10
11
12
13
14
15
16
17
18
19
20
21
22
23# 使用国内pypi源,使用阿里云的源
# 备选:http://pypi.douban.com/simple/ https://pypi.tuna.tsinghua.edu.cn/simple/ https://mirrors.aliyun.com/pypi/simple/
mkdir -p ~/.pip
cat > ~/.pip/pip.conf <<- "EOF"
[global]
index-url = https://mirrors.aliyun.com/pypi/simple/
[install]
trusted-host=mirrors.aliyun.com
EOF
# 一些基于python的实用或者有意思的工具
# 不加sudo 会安装到/home/aaa/.local目录下,需要将/home/aaa/.local/bin目录配置到path路径下,才能访问
cat >> ~/.bashrc <<- "EOF"
export PATH=/home/aaa/.local/bin:$PATH
EOF
source ~/.bashrc
sudo pip3 install cheat mycli icdiff you-get lolcat youtube-dl speedtest-cli supervisor gixy cowsay
# pip 命令自动补全
pip3 completion --bash >> ~/.bashrc
source ~/.bashrc
sudo pip3 install --upgrade pip
# 更新完pip3后需要重新打开终端,才能生效Nodejs
1
2
3
4
5
6
7
8
9
10
11
12
13
14
15
16
17
18
19
20
21
22
23sudo apt install nodejs npm -y
# 会在当前用户目录下生成一个.npmrc配置文件
npm config set registry https://registry.npm.taobao.org/
npm config set sass_binary_site https://npm.taobao.org/mirrors/node-sass/
npm config set electron_mirror https://npm.taobao.org/mirrors/electron/
# 切换到root环境下再设置一次,目的是在root用户目录下生成.npmrc配置文件
sudo su
npm config set registry https://registry.npm.taobao.org/
npm config set sass_binary_site https://npm.taobao.org/mirrors/node-sass/
npm config set electron_mirror https://npm.taobao.org/mirrors/electron/
# 安装n ,用来管理node版本
sudo npm install -g n
echo "export NODE_MIRROR=https://npm.taobao.org/mirrors/node/" >> ~/.bashrc
export NODE_MIRROR=https://npm.taobao.org/mirrors/node/
# 使用n安装最新node版本
sudo -E n latest
# 退出终端重新进入即可生效
exit
# 一些基于npm 常用的包
sudo npm install npm get-port-cli hasha-cli http-server live-server prettier @vue/cli -g
# npm 命令 tab 补全配置
npm completion >> ~/.bashrc
source ~/.bashrc关于sudo环境变量的问题,参考 这篇文章
MySQL
1
2
3
4
5
6
# 如果需要安装mysql-5.7,将后面的 mysql-8.0 改成 mysql-5.7
echo "deb [arch=amd64] http://mirrors.tuna.tsinghua.edu.cn/mysql/apt/ubuntu bionic mysql-8.0" | sudo tee /etc/apt/sources.list
# 信任mysql的公钥
sudo apt-key adv --keyserver keyserver.ubuntu.com --recv-keys 8C718D3B5072E1F5
# 安装mysql8
sudo apt install mysql-community-server安装时会有交互界面提示输入root密码
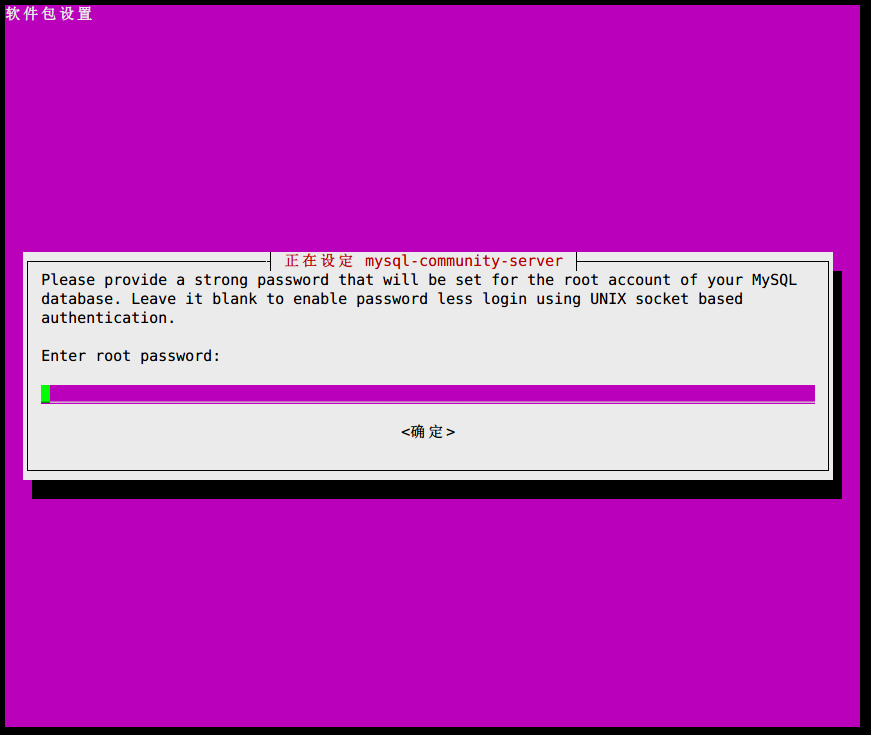
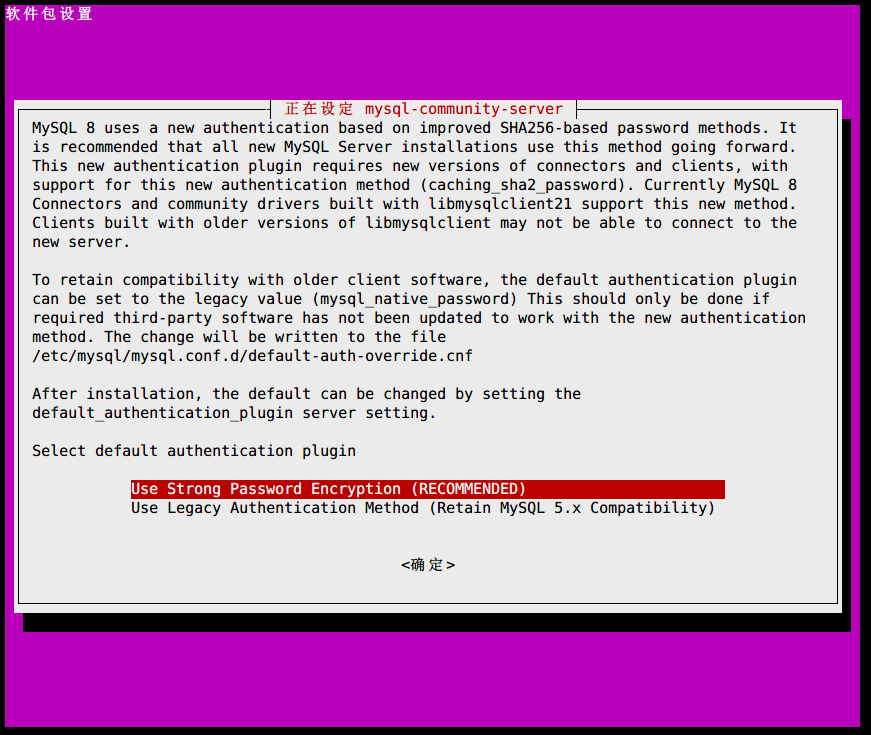
就选推荐的吧
1
2
3
4
5
6
7
# 启动mysql服务
sudo systemctl start mysql
# 连接测试
mysql -uroot -p
# 推荐使用mycli,比默认的mysql命令更加好用
sudo pip install mycli
mycli -uroot配置远程访问:
登录mysql
1
2
update mysql.user set host='%' where user='root';
flush privileges;
Docker
1
2
3
4
5
6
7
8
9
sudo apt-get remove docker docker-engine docker.io -y
sudo apt-get install apt-transport-https ca-certificates curl gnupg2 software-properties-common -y
curl -fsSL https://download.docker.com/linux/debian/gpg | sudo apt-key add -
sudo add-apt-repository \
"deb [arch=amd64] https://mirrors.tuna.tsinghua.edu.cn/docker-ce/linux/debian \
$(lsb_release -cs) \
stable"
sudo apt-get update
sudo apt-get install docker-ce
配置docker加速器可以参考 [这篇文章](https://juejin.im/post/5cd2cf01f265da0374189441)
GoLang
1
2
3
4
5
6
7
8
golang_version=$(curl https://golang.google.cn/dl/ | tr -d '\n'| grep -oP 'Stable.*' | grep -oP 'go[0-9|a-z|.]*linux-amd64.tar.gz' | sort -rV | xargs | awk -F ' ' '{print $1}')
echo ${golang_version}
cd /usr
sudo wget https://dl.google.com/go/${golang_version}
sudo tar -zxf ${golang_version}
echo "export PATH=\$PATH:/usr/go/bin" >> ~/.bashrc
source ~/.bashrc
go version
C/C++
1
sudo apt install -y cmake gcc clang gdb valgrind build-essential
QT
国内镜像源:
以 qt-opensource-linux-x64-5.9.8.run 为例:
1
2
3
wget https://mirrors.tuna.tsinghua.edu.cn/qt/official_releases/qt/5.9/5.9.8/qt-opensource-linux-x64-5.9.8.run
chmod 755 qt-opensource-linux-x64-5.9.8.run
./qt-opensource-linux-x64-5.9.8.run
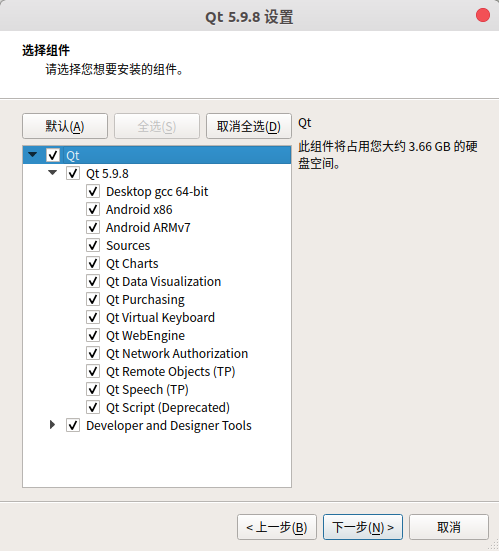
这时会弹出安装界面
不知道勾选什么的话就全勾上吧,反正全勾上也不过占用了3个多G的空间
10. 系统美化
安装gnome-shell, 参考
1 | sudo apt install gnome-tweak-tool -y |
11. 自定义终端打开时的位置和大小
1、打开一个终端,把它调整到自己想要的大小和位置
2、在终端内执行xwininfo,此时鼠标变成十字,等待你用鼠标点击终端窗口,点击终端窗口后就会出现终端窗口的信息,注意最后一行,比如:-geometry 76x11-33-24
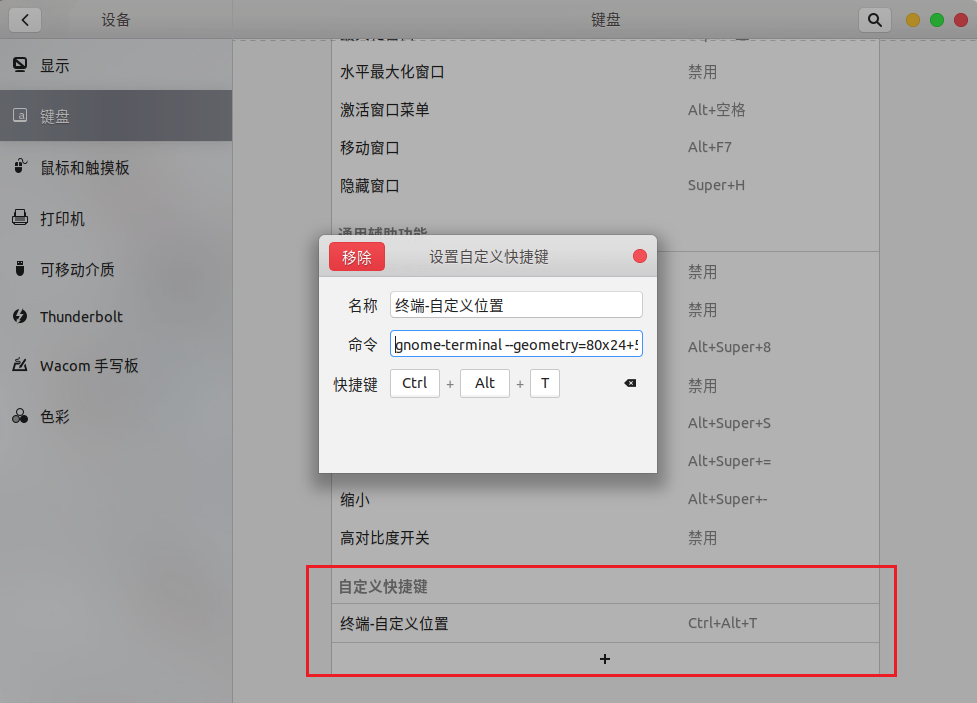
3、System Settings ==》keyboard ==》 Shortcuts,点击Add按钮,Name:”打开一个终端(自定义)”,Command:
gnome-terminal --geometry=76x11-33-24 --working-directory=~
注意--geometry=76x11-33-24的值就是通过第2步获得的
4、给这个自定义的command设置快捷键,如果想改成ctrl+alt+T,需要先将默认的终端的快捷方式改成其他的

12. 让终端只显示当前路径,而不显示绝对路径
1 | vim ~/.bashrc |
在大约60行左右
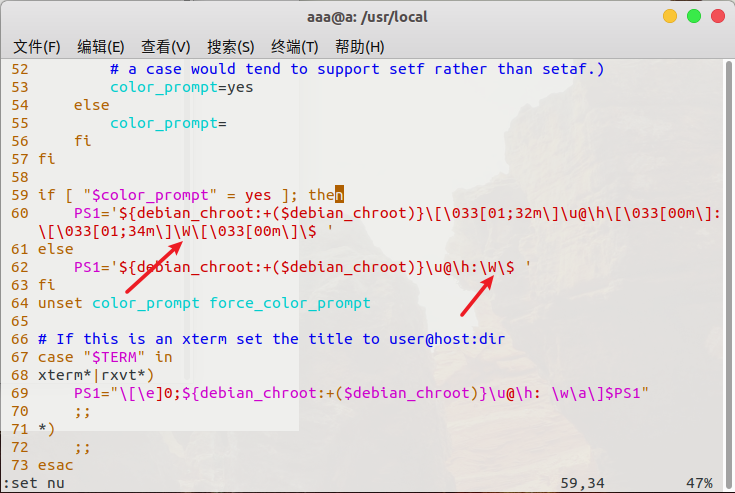
图中2处小写的w改成大写的W,即:
1 | if [ "$color_prompt" = yes ]; then |