一、编写相关python脚本
python版本为3.6.8
邮件发送脚本 - sendmail.py,将上面几行smtp的配置换成你自己的
1
2
3
4
5
6
7
8
9
10
11
12
13
14
15
16
17
18
19
20
21
22
23
24
25
26
27
28
29
30
31
32
33
34
35
36
37
38
39
#!/usr/bin/python3
import smtplib
import sys
from email.header import Header
from email.mime.text import MIMEText
from email.utils import formataddr
# 第三方 SMTP 服务
mail_host = "smtp.qq.com" # 设置服务器
mail_user = "xxxxxx@qq.com" # 用户名
mail_pass = "xxxxxxxxxxx" # 口令
sender = 'xxxxxxxxx@qq.com' # 发送者
def send_mail(subject, content, receivers, type):
message = MIMEText(content, type, 'utf-8')
message['From'] = formataddr(["xxxxxx", sender]) # 括号中对应发件人邮箱昵称、发件人邮箱账号
message['Subject'] = Header(subject, 'utf-8')
try:
smtpObj = smtplib.SMTP_SSL(mail_host)
smtpObj.connect(mail_host, 465) # 25 为 SMTP 端口号
smtpObj.login(mail_user, mail_pass)
smtpObj.sendmail(sender, receivers, message.as_string())
except Exception as e:
print(e)
if __name__ == "__main__":
# html_type = 'plain'
html_type = 'html'
if sys.argv.__len__() > 3:
sub = sys.argv[1]
content = sys.argv[2]
to = sys.argv[3]
print(to)
send_mail(sub, content, to, html_type)
print('邮件发送成功!')
else:
print('参数不够!')ip地理位置信息查询 - ipinfo.py
参考 Ip2region 项目,将项目中 binding/python/ip2Region 和 data/ip2region.db 复制到 /bin 目录下,也可以放在别的目录下,最好和 ipinfo.py 在同一目录下,下面的配置文件就得跟着一起修改了
1 | #!/usr/bin/python3 |
二、安装fail2ban
(1)使用yum安装
1 | yum install -y epel-release |
启动服务1
systemctl start fail2ban
允许开机自启1
systemctl enable fail2ban
(2)源码安装
最好先update一下1
2
3
4yum update
git clone https://github.com/fail2ban/fail2ban.git
cd fail2ban
python setup.py install
如果没有git,安装git1
yum install -y git
安装完后将fail2ban添加到systemd服务1
cp build/fail2ban.service /usr/lib/systemd/system/fail2ban.service
对于新创建的unit文件,或者修改了的unit文件 需要重载配置文件1
systemctl daemon-reload
启动服务1
systemctl start fail2ban
允许开机自启1
systemctl enable fail2ban
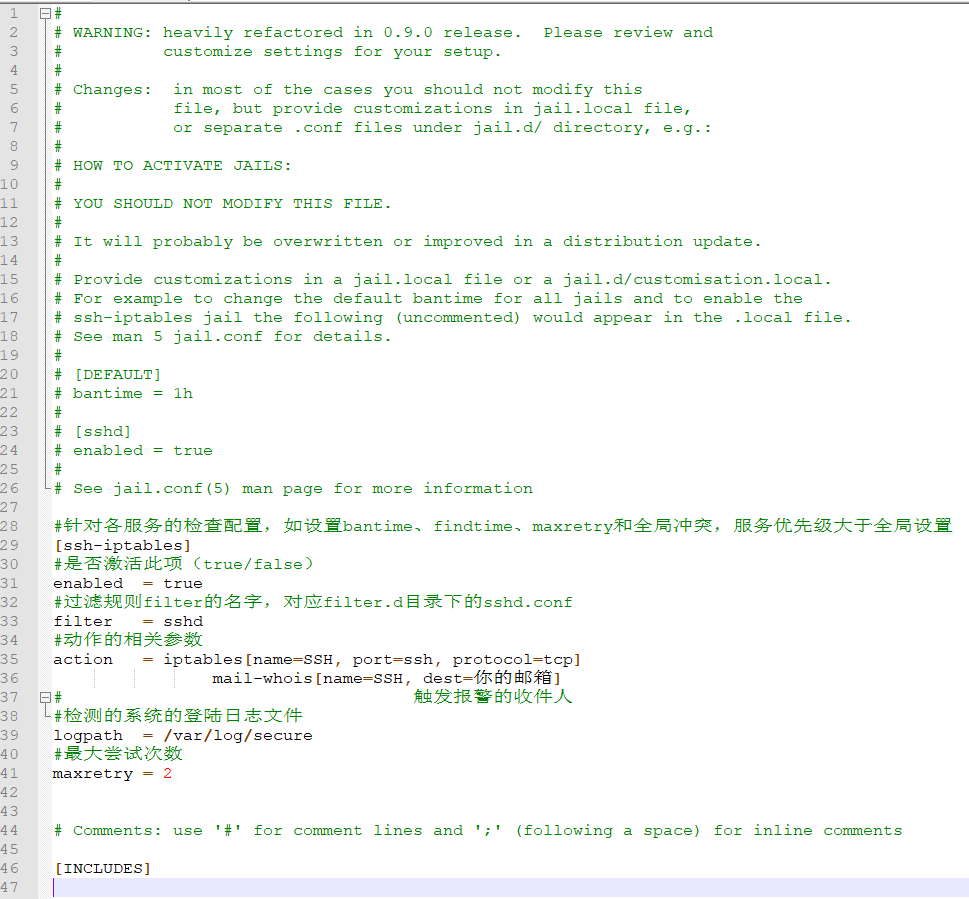
三、配置jail.conf文件
1 | vim /etc/fail2ban/jail.conf |
在文件开头加入如下内容1
2
3
4
5
6
7
8
9
10
11
12
13
14#针对各服务的检查配置,如设置bantime、findtime、maxretry和全局冲突,服务优先级大于全局设置
[ssh-iptables]
#是否激活此项(true/false)
enabled = true
#过滤规则filter的名字,对应filter.d目录下的sshd.conf
filter = sshd
#动作的相关参数
action = iptables[name=SSH, port=222, protocol=tcp]
mail-whois[name=SSH, dest=你的邮箱]
# 触发报警的收件人
#检测的系统的登陆日志文件
logpath = /var/log/secure
#最大尝试次数
maxretry = 2

在[DEFAULT]子项里有一些属性也建议修改一下
1 | #ip 被封禁的时间,单位:s(秒),m(分钟)。 |

编辑 /etc/fail2ban/action.d/mail-whois.conf
如果是通过yum安装的,可能会不存在此配置文件,可以直接创建此文件,或者将源代码克隆下来
1 | git clone https://github.com/fail2ban/fail2ban.git |
配置文件都在fail2ban/config/action.d/下面,

将缺少的配置文件复制到/etc/fail2ban/action.d/下面即可1
2
3cp config/action.d/mail-whois.conf /etc/fail2ban/action.d/mail-whois.conf
vim /etc/fail2ban/action.d/mail-whois.conf
修改成类似如下配置:
1 | [INCLUDES] |
重启fail2ban
1 | systemctl restart fail2ban |
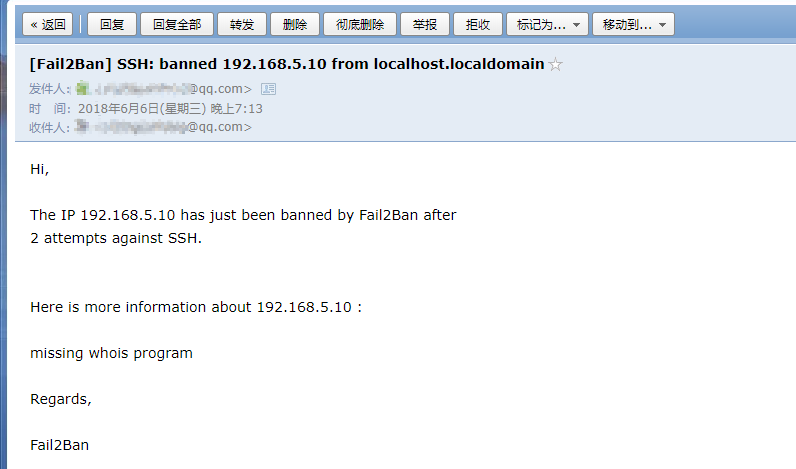
用另一台虚拟机测试,可以看到在2次尝试登陆失败后,fail2ban立刻就生效了,再次尝试连接时就直接被拒绝了


查看fail2ban的运行状态,可以看到一个jail(监狱)正在运行中1
fail2ban-client status

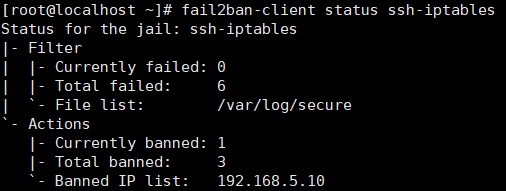
查看jail的详细信息,可以看到被封禁的ip1
fail2ban-client status ssh-iptables

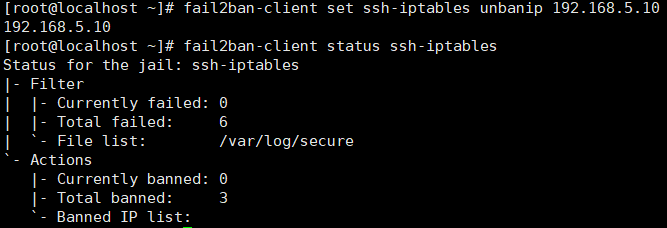
解封ip:1
fail2ban-client set ssh-iptables unbanip 192.168.5.10

注意!如果修改过系统时间的时区,日志的记录时间还是以之前的时区进行记录日志,/var/log/secure记录的时间跟系统时间不对的话,fail2ban的核心功能就会完全失效,也就是说封禁不了ip。所以修改过系统时间的时区之后,一定要重启一下系统日志服务(rsyslog)1
systemctl restart rsyslog
参考资料:
https://my.oschina.net/plutonji/blog/191683
https://www.fail2ban.org/wiki/index.php/MANUAL_0_8
https://linux.cn/article-5067-1.html
https://www.cnblogs.com/wangxiaoqiangs/p/5630325.html
https://www.cnblogs.com/jasmine-Jobs/p/5927968.html
http://www.cszhi.com/20131101/fail2ban.html